Call or Write to: Church Bell Ministry -
Ph 423 926 3685
Cell: 423 747 0585 Email:
davessmith1001@gmail.com
We are Back! Changed Web Hosting suppliers. Uhg!
We
are sorry for any inconvenience.
Welcome
to the Church
Bell Ministry Website
Does your Church Have a Church Bell Ministry? What is that? A Church Bell Ministry
is one that utilizes the bell(s)
to witness to the community that God
Lives Here! The bell is an
outward invitation to the church whether it is heard by a church member or a
passerby.
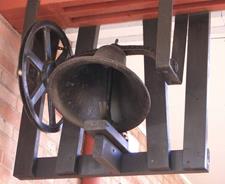
Your Church Bell
Ministry provides your church the
recognition it deserves and praises GOD
every time it rings. Vintage
church bells were designed and manufactured for their pleasant
sound qualities, so why not show off a little! Look WHO we are showing off!
Church Bell Ministry
on a regular schedule once again in
To
provide an automated ringer system that is affordable for ALL churches.
Start Your Church Bell Ministry with a Programmable Church
Let
your church’s bell synchronize your community with the exact time (within one
second
of NIST time) and celebrate our Lord
with a familiar American sound!
Your
Bell can draw attention to the Lord and your church during the daytime
using
the TOD Clock Chime, even when no one is
there.
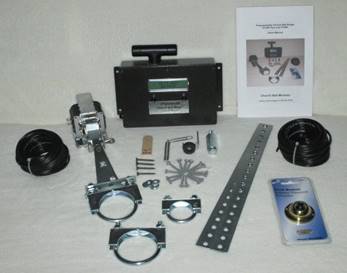
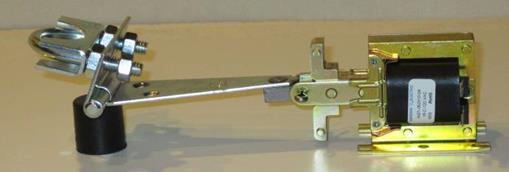
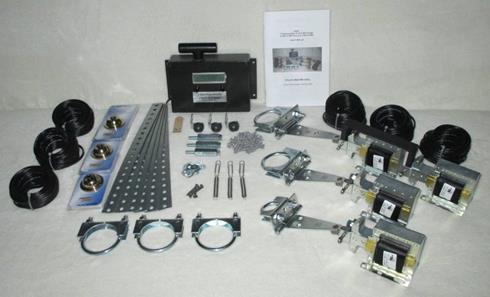
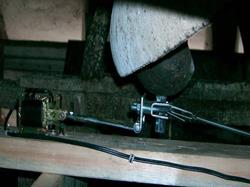
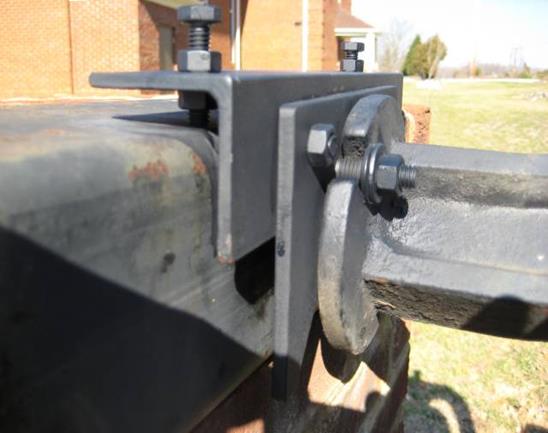
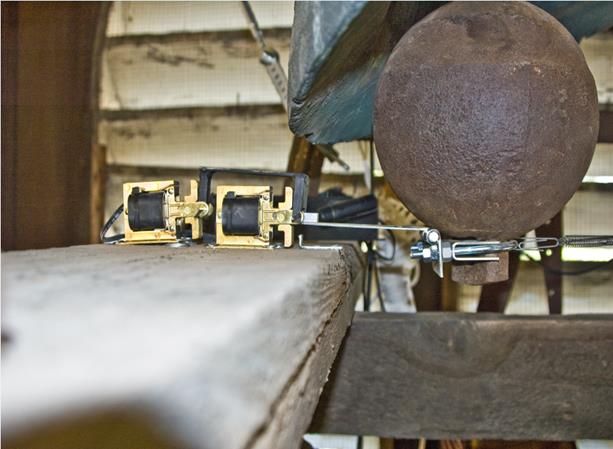
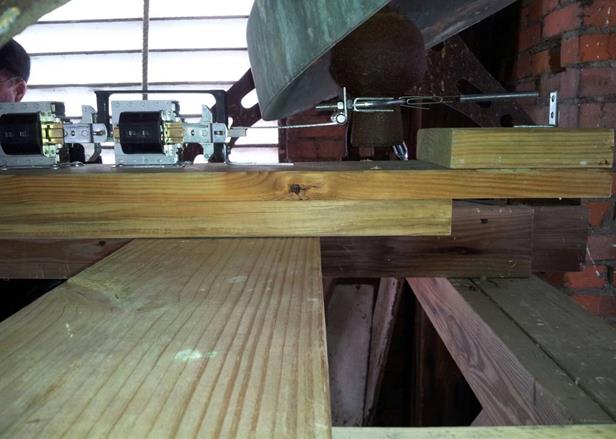
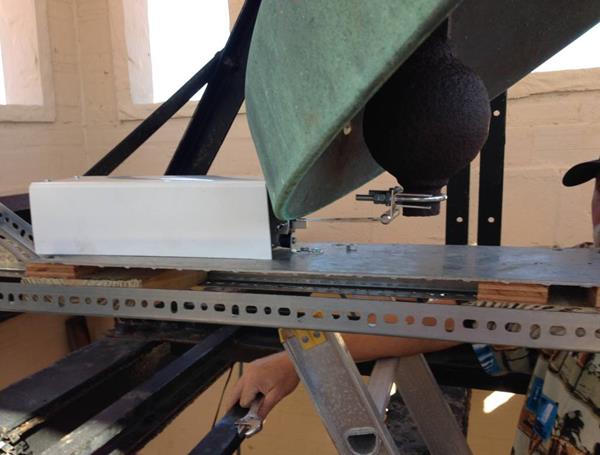
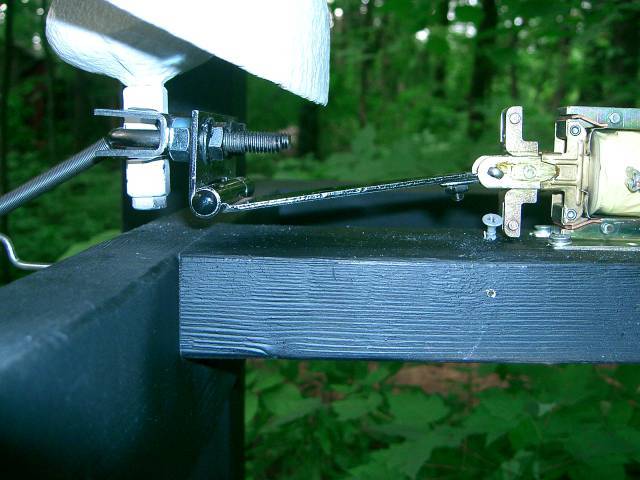
The Programmable Church Bell Ringer
System includes a Remote Solenoid to pull the bell’s clapper
against the bell to preserves the original tone of the bell. The “10 Pounder” Solenoid is used for bells 15” diameter and under. The “20 Pounder” Solenoid is employed for most bells and the “40
Pounder” is available for very large bells. These values are the rated force of each
solenoid.
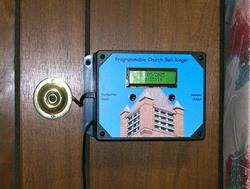
The PCBR Hardware System
Features: The PCBR’s Controller is a Rabbit Semi 2000
Embedded Computer System. TOD Clock never needs setting with
built in atomic clock radio receiver. 2 line 16 character display LCD display
prompts all programming steps. Battery Backup retains TOD and flash
memory saves your user settings. World
Supplier of Affordable Church
The PCBR-I Kit is now available with an international option
which operates from 230vac!!!!!!
The Programmable Church Bell Ringer Plus’s User
Manual helps make
the system kit simple to install.
A PCBR
System
Wiring Diagram is available by clicking on this
link.
The
PCBR – International System Wiring Diagram is
available too!
The PCBR Plus box programs easily with
the two menu driven front panel pushbuttons and the 2 line LCD display.
The Church Bell Ministry is your supplier for D
I Y Church Bell Automation Equipment!
Simple mechanical design
provides years of reliable maintenance free service!!!
PCBR Plus and the 3 Bell PCBR Plus Kits
are available with an Atomic Clock Radio Receiver !
Because of customer feedback the
Programmable Church Bell Ringer is now available with an integrated Atomic
Clock Radio Receiver that automates
setting the clock, changing the clock at Daylight Savings Time and provides
time accuracy that is regularly
updated from the NIST Transmitter located near
How does that work? What does WWVB mean? http://tf.nist.gov/stations/wwvb.htm
State of the art electronics provides many
ring pattern and bell size options !!!
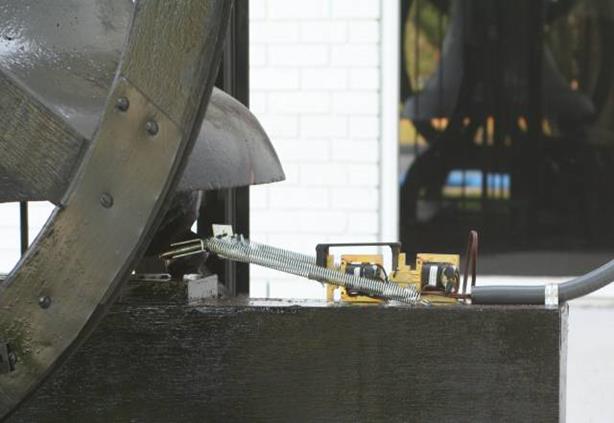
What’s in the box ? Put it this way – it’s
a lot more than just a timer.
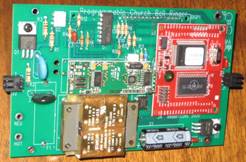
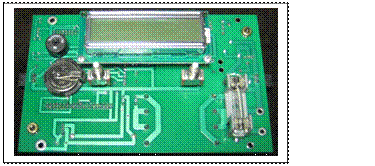
The front side of the circuit board has the
LCD The rear side or component
side has the Rabbit 2020,
display, pushbuttons, battery, beeper and
fuse. the C-Max CMMC-8 Atomic
Clock Radio and other parts.
Think of the PCBR Box as an alarm
clock, except that it operates on a weekly schedule.
With the PCBR Plus Box – Set your
weekly ring schedule, select TOD Chime and forget it!
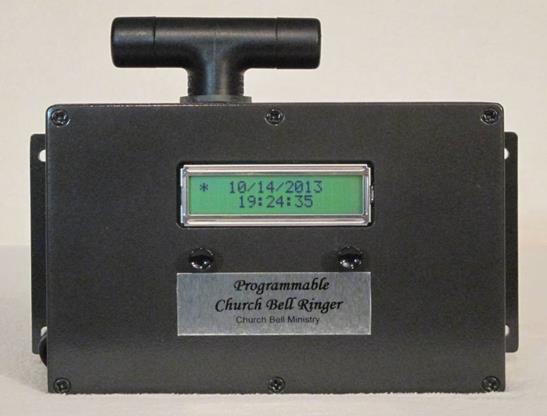
The PCBR Controllers are housed in a die cast aluminum enclosure with a
dark hammer tone
painted finish. Very Nice!
Einstein once s
Shown
below are the three locomotives that provide the clapper strike to match any
bell.
The 10 Pounder pulls the clapper with a 10 pound force. For 15” and smaller bells.

The 20 Pounder pulls the clapper with a 20 pound force. For 18” and up that pass the
one finger pull test. With the
bell tilted, if one finger will flip the clapper into the
side of the bell for a solid ring, then this is the correct solenoid for
your bell.
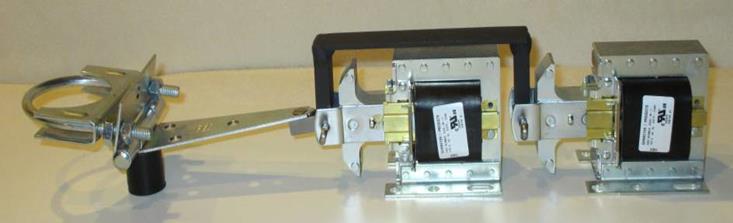
The 40 Pounder pulls the clapper with a 40 pound force. For very large bells. With the
bell tilted, if two fingers are required to flip the clapper into the
side of the bell for a
solid ring, then the 40 Pounder is the correct double solenoid for your
large bell.
PCBR
Software Features: Six Programmable Weekly Ring Times that announce each service by ringing for 1 minute
> Chimes on the hour from
> Chime at
>
> Angelus Ring Only
> TOD Chime and Angelus
Ring > No TOD Chime and Angelus Ring Clapper Solenoid active
(30, 60, 90 and 150 mSec) Bell Delay Time (1.5, 2.0, 2.5 and
3.0 Sec) Selectable ring pattern (single or twin ring) Manual Remote Pushbutton
rings the bell too Selectable ring pattern (single ring,
twin Ring, 25 ring peal, Angelus Ring and a Funeral Toll Ring) Call
or Write to: Church Bell Ministry Dave Smith 37659 Ph 423 926 3685 Cell: 423 747 0585 Email:
Six Optional Time of Day Clock Chimes

The Church Bell Ministry
is your supplier for DYI Church Bell Automation Equipment!
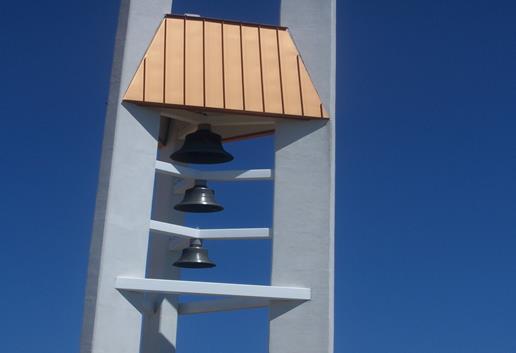
The Church Bell Ministry
offers a cost effective ringing solution for Catholic Three Bell Towers.
The Three Bell PCBR
Box provides the ring features below and all in one PCBR Box. Cool!
Small
Medium
three strikes, pause,
three strikes, pause, three strikes, pause, nine strikes.
Large
every 10 seconds for 5 minutes.
All Three Bells
–
The Wedding Toll provides a showering of all three bells in a pseudo random
ring pattern for one minute.
3 ·
3 Manual Push Buttons and Wire (0ne for each bell) ·
3 ·
Three ·
Clapper and Installation Hardware ·
3 Clapper Linkage Solenoid Sets (1 w/ Double Solenoid) ·
Installation and User’s Manual (rear of photo)
All three bells offer six
weekly ringtimes, with a selectable single or double ring pattern. (Ding or Ding – Dong)
Time of Day Clock Chime (
Three Manual Pushbuttons (1
for each bell) for ring operations with five selectable ring functions.
The Three Bell PCBR Box
is available as standard or Three Bell PCBR PLUS Box with the Atomic Clock Radio
Receiver.
The 3
The 3 Bell
Wedding Toll makes for a joyous celebration.
Click for a Wedding
Toll video from St. Mary’s in
The 3 Bell
PCBR Plus User’s Manual can be downloaded here!
A 3 Bell Ring
Schedule Form is available for download:
3 Bell Ring Schedule Form
Note: If the solenoid
hammers on your bell(s) are intact, the PCBR Box and an external solid state relay
(OPTO 22 P/N
240A25) or contactor (EATON
P/N C25BNB225A) with 120vac coil provides a cost effective replacement
controller!
(The cost of the Solenoid(s)/Linkage,
Bell Mounting Kit is excluded in the price)
(
The Programmable
Church Bell Ringer operates from 105 -130 vac power. The cost to operate is only pennies per year.
Speaking of cost – The PCBR System Kit (includes everything except the
2x4s) sells for $695 for the standard system kit.
- The PCBR-I System Kit (same as above but 230vac) sells for $745 for the standard system kit.
- The PCBR Plus System Kit with Atomic
Clock Radio sells for $895.
- The Three Bell PCBR System Kit sells for $1395. The Three Bell Kits include three sets of
solenoids
and linkage including a
Double Solenoid option for the Large or “DeProfundis”
- The Three Bell PCBR-I System Kit sells for $1445. (Same as above but 230vac power input).
and linkage including a
Double Solenoid option for the Large or “DeProfundis”
- The Three Bell PCBR Plus System Kit sells for $1595.
Since the goal of the Church
Bell Ministry is to ring God’s Bells, all models have a ten year warrantee.
Specify bell size(s) on the order form
as 15” or smaller which uses the “10 Pounder”. Larger bells (the one finger test)
use the “20 Pounder” Solenoid. Very large bells (the two finger test) use
the “40 Pounder” Solenoid.
See the application note below about
solenoid selection for installation.
How to Order
To start your
Church Bell Ministry, order the Programmable Church Bell Ringer System
Kit.
Please mail a check or money order to
the above address made out to: Church Bell Ministry
for $715* for the Standard PCBR Kit
for $745*** for the PCBR-I Kit
(International – operates on 230vac)
for $1415* for the Standard Three Bell PCBR
Kit
for
$1445*** for the Three
* shipping is included in above prices. Please supply ship to info.
*** USPS International Priority Mail
not included (typically $56 to $80 extra)
For
international orders please use
Specify which PCBR Kit, bell size(s),
optional PVC Solenoid Cover(s) using the order form below.
Since most
church’s do not have credit card accounts, we are sorry but we cannot process
them.
If you are
anxious about mailing a check (your church’s money) to an unknown company for
something that must be
installed or assembled, please be
assured that your complete satisfaction is our promise. This ministry’s goal is to regularly ring our church bells to glorify
God, not to make financial gain.
Feedback from our customer’s delight is our profit!
Here’s what
customers are saying about the Church Bell Ministry:
Ray from
Jim from
Julie from
Ohio, “I found
to do for the
price he was asking.”
Bobby from California, “The Bell is a 24 inch, cast Iron bell that
weighs about 140-160 pounds. It actually
is a
School Bell, but it sounds
great. It's not too loud and just loud
enough. This project came out really
good.”
NOT made in China! Each PCBR Plus Kit and PCBR Kit is
manufactured in Jonesborough Tennessee, USA!
The Church Bell
Ministry has PCBR Kits installed in the
The Church Bell Ministry is the only
Bell Automation Equipment Supplier to provide ‘on line’ pricing. That says a lot!
Use this easy Order Form
to
mail your order.
Click Here
There is no
need for a Capital Campaign to get your bell ringing again!
Great idea for: a Memorial, a Youth Group Project, a
Homecoming event,
a
Centennial Celebration, or other Special Celebration
Get
your group together and see if your church community
doesn’t need to give GOD a little extra attention.
Bring back to your community an American
tradition and Give GOD the Glory!
The Church Bell
Ministry is your supplier for DYI Church Bell Automation Equipment!
Be
sure to listen to some of the mp3 files below demonstrating these bell’s
natural sound!!
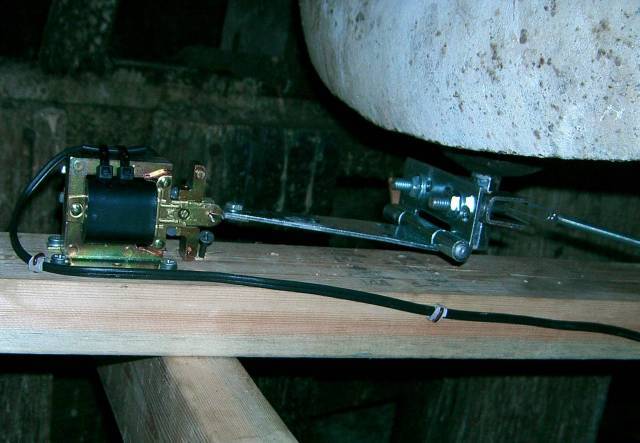
Here is the way the Programmable Church Bell Ringer Kit
installs into a church!!
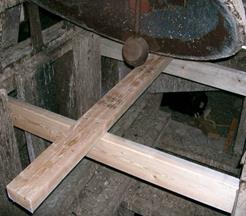
Step 1: Strap down the
tilted bell with Clapper hanging 1” from side of bell. Step 3: If the clapper
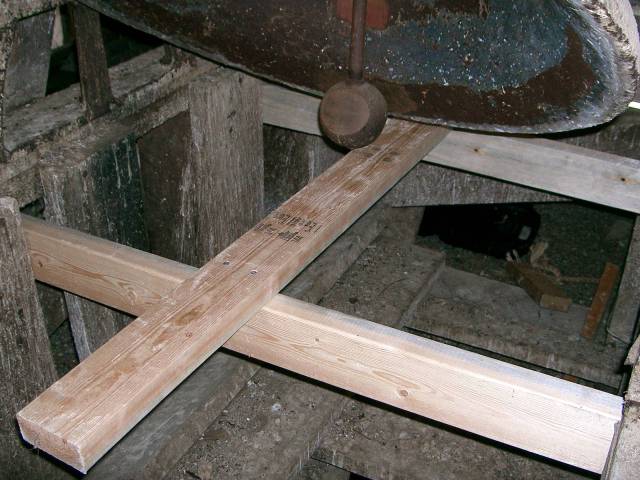
does not have a Protrusion, drill, tap & mount standoff. Step 2: Construct a Subframe to the bell’s Main Frame 2“ below free hanging clapper.
Step 5: Mount the PCBR Box and Manual Ring PB and connect
cable from Solenoid. Step 4: Install
Solenoid and connect Plunger linkage to the clapper bottom. Step 6: Program the
PCBR for your Ring Times and enable the TOD chime. Enjoy!
Free
Installation Advisement Available: Send
an email to davessmith@embarqmail.com
with an attached digital picture (*.jpg)
of your bell. We will review and respond
with recommendations.
BELL APPLICATION NOTES
Bell installations are as various as the
creativity of the mind of the installer.
Here are some examples that show
various methods of building the subframe,
positioning the bell and connecting the solenoid linkage to the clapper.
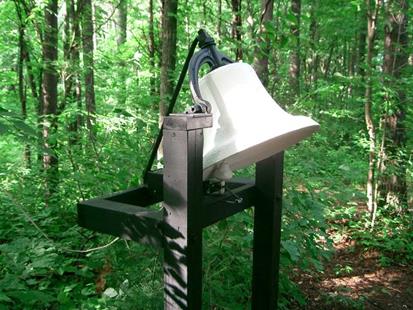
This bell is
installed in the church sign which is located on the side of the roadway. The PCBR Box is installed inside the church
and the solenoid
cable is buried
in plastic conduit. The solenoid wire is
snaked down behind the wallboard and exits the building through a hole drilled
through the brick.
A small junction
box secured to the brick provides a clean transition into the conduit
A man stopped by when I was working on
this bell and asked why it was tilted. I
explained about
the 1“ clapper travel etc…………Then
I s
Some customers did not want to
tilt their bell. The clapper can be
preloaded using a pair of hard rubber
stops that cradle the relaxed clapper
appropriately for the 1” solenoid travel.
This obviously reduces
the strike force because the
effects of gravity. To offset gravity,
two springs can be installed from the
clapper linkage to the solenoid
frame that restore the strike force of the of the PCBR system.
Click on the link for a mechanical
(top view) sketch of the preloaded clapper installation! No Tilt
The PCBR Kits do not normally
include bumpers, so indicate on the order form that you require them.
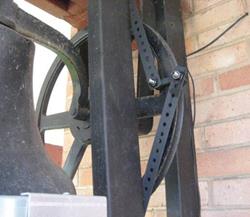
The tilt mechanism on
this bell installation takes full advantage of the original flange that
connected to the rope lever when the bell was
installed in the
tower. A steel plate, with a “U” shaped
cutout to allow it to fit around the bell shaft, provides strong connectivity
to the
angle adjuster plate. As seen in the picture above, it is hardly
noticeable. Nice for a bell on display.
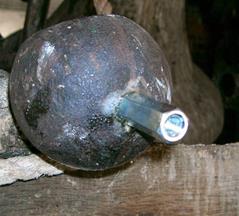
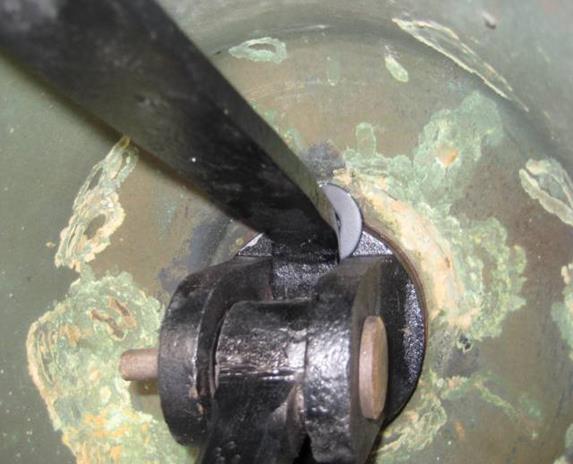
Most bigger bells have
a spring damper that repels the clapper from the side of the bell except for
the impact strike. This damper
can interfere with the
clapper’s path and reduce the force of the solenoid when striking the bell. It can be shifted out of the way
by inserting a washer
or shim under one side. The top nut will
need to be loosened to insert this shim then retightened.
If this is not
possible, see below.
The spring damper
on this beautiful bell in Wellington, Ohio is spread using two pieces of steel
rod threaded on one end and a
threaded
coupling. The required amount of
separation to achieve clearance is actually quite small. Two pieces of 3/8” threaded
rod cut to the
appropriate length with a hack saw and the hex threaded coupler included with
the PCBR Kit, lock nuts and
Loctite/Gorilla
Glue does the job very nicely. No machine shop effort required! Jim, thanks for the nice picture!
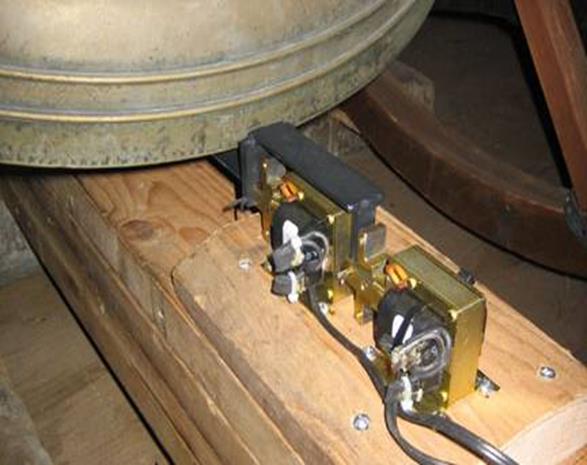
Very large bells
with clapper weight exceeding 8 pounds can use interconnect linkage in a tandem
solenoid pair which will double
the strike force. The solenoids are wired in parallel so they
will activate simultaneously. The drive
circuitry of the PCBR box will
easily handle two
solenoids, but the fuse value will have to be increased due to the change in
load current.
The easiest way to
determine one solenoid or double solenoid is to ring the bell when tilted with
your finger(s). If one finger pulls
the clapper into the
bell easily – then order a single solenoid.
If the mass of the clapper requires two fingers to pull the clapper
against the side
of the bell – then a double solenoid is recommended. As expected, the clapper shown in this picture
took two
fingers. This bell rings at the
The PCBR Kit can be
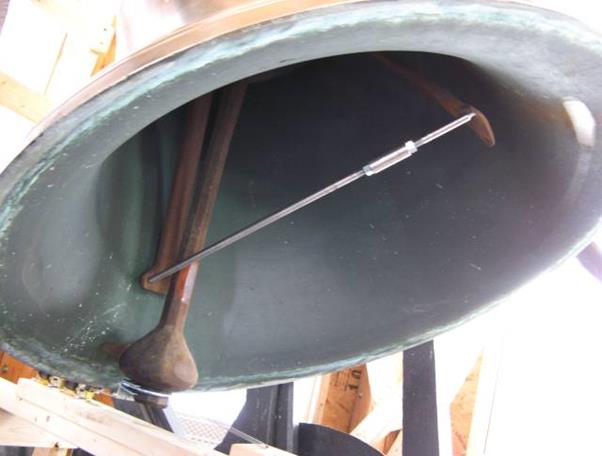
installed without tilting the bell.
Rubber bumpers “catch” the clapper when the solenoid is not active.
Note the two
springs installed to offset the pull of gravity. Their force is determined using a force gauge
or a simple fish scale.
Connect the scale’s hook to
the bottom of the clapper and pull the clapper to the side of the bell. The spring force is one half
of the measurement
(two springs). Select the spring with a
force just less than ½ to assure the clapper, when relaxed, will fall
away from the side
of the bell. Note the reflection of the
bell installed at
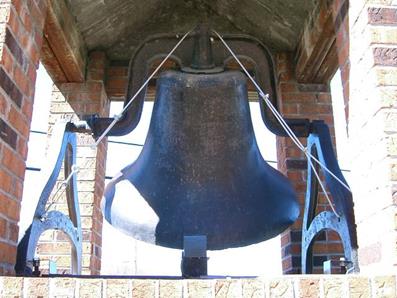
This “40 Pounder” is installed on a
Profundus bell that was cast in 1883. It
is part of the Three Bell Tower of Saint Boniface
Catholic Church in
Brunswick, MO. The 3 Bell PCBR Plus Kit
provided a complete tower ringer system replacement for $1595.
Thanks for the
nice picture, Alan!
This bell
installed in the First Presbyterian Church in Daytona Beach is back in service
for the Lord using a PCBR Plus Kit
with a “40
Pounder”. Stuart is using a steel frame for mounting the solenoids minimizes
any tower resonance that is possible
when the
solenoids pulse. The final touch for
this installation is a good coat of polyurethane on the solenoids, linkage and
metal framework
to protect from the salt air. Jim,
thanks, we always enjoy pictures.
A bell enthusiast at this Catholic Church
rebuilt the bell hammer solenoids and replaced the rectifiers from the original
bell
automation
system. He used the PCBR controller as a
cost effective replacement. The ring
patterns for the
Bell Tower include:
1) Large Bell –
Funeral Toll Ring or 1 strike every 10 seconds for 5 minutes initiated with
manual pushbutton
2) Middle Bell – Angelus
Ring or three
strikes, pause, three strikes, pause, three strikes, pause, nine strikes and
rings at
12 noon and 6 PM
3) Small Bell – Call
to Mass
A Time of Day Chime
can be selected for any one of the three bells as desired
Joe, thanks for the
picture.
Some of the most
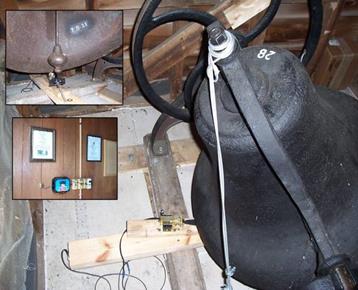
beautiful bell towers can be found in the most obscure places. This one is located in Limestone Tennesse.
Where??? You see what I mean. The bell in this tower is shown above
in steps two and three. It required the
clapper
standoff. Cast iron, the usual clapper material,
actually drills and taps quite easily.
Loctite or Gorilla Glue on all machine
threads is an
installation requirement!

These audio clips will demonstrate some
of the PCBR timing settings.
Click Here for Audio Clip of a
Click Here for Audio Clip of a
This bell is suspended from two angle iron struts that bolt to
the overhang frame of the church’s drive thru. This beauty has a rich sound that sounds
like BRASS. Being located at the
church’s main entrance, it demands immediate attention, even when not
ringing.
Click Here for Audio Clip of a
Most churches today are well insulated to minimize energy
usage. This also keeps the sound of
the bell outside too. Uhg! This church installed a microphone about
eight feet from the bell in their steeple and ran it thru their PA system
soundboard. The bell sounds natural
and true inside the church now too!
Click Here for Audio Clip of a
Click Here for Audio Clip of a
This bell is positioned using a coated steel cable fastened to
the bell frame, then extended over the cap nut at the top of the
cradle. A turnbuckle installed in
the left side provides tilt adjustment.
This is a very simple and effective tilt mounting method. The solenoid mounts to a wooden baseplate attached to each
side of the bell frame.
This bell served its
community in both school and church.
Note that the solenoid installation angle is aligned to match the
clapper
swing instead of
perpendicular. The main item is smooth
solenoid plunger travel! If I were over
a hundred years old, my frame would
be twisted just a little too.
It sure doesn’t affect its sound. Listen to the YouTube video clip of the bells
recent rededication. It doesn’t
get much better than this! Note the picture insets. Thanks, Steve
The Women’s Guild at this historic church decided to see what
it would take to get their bell ringing again. The bell manufacturer quoted
$9600 to automate it. A concerned
member who was an engineer found the PCBR Kit on the web and decided to
prototype the installation with it before spending the $9600. When the PCBR Kit was installed, the bell
sounded so wonderful, the high dollar option was deemed a dead issue. The
PCBR Kit is $695. Click Here for Audio Clip of a

This bell is positioned using a 1 inch steel strap fastened to
the cap nut at the top of the cradle then to the rear of wooden bell
mounting frame. When the bell is
positioned correctly, the rear mounting hole is match drilled for a lag
bolt into the wood frame . The solenoid mounts on the wooden frame members. Don’t forget the Loctite or Gorilla Glue on all machine
threads. Click Here for Audio Clip of a
Click Here for Audio Clip of a
This bell is also positioned using a 1 inch steel strap fastened
to the cap nut at the top of the cradle but then up to the top rear of the metal bell mounting frame. The solenoid is mounted to an added wooden subframe that
attaches to the original metal frame. Outdoor bells require a rain cover over the solenoid. Click Here for Audio Clip of a
Click Here for Audio Clip of a

This clapper did not have a
rope attachment extension and required installing the hex extension. A 5/16 – 18 thread was drilled and tapped
at the very bottom of the
clapper. Most clappers are made of cast
iron and drill and tap very nicely. Note
the solenoid linkage and return
spring. This simple setup has been demonstrated to go
for several hundred thousand rings.
A typical
bell tower could have access to the bell by means of a ladder of wooden straps
going STRAIGHT UP. This could be a
little
intimidating. One trip up with an
extension cord or rope used to get the user manual, tools, 2x4s and kit parts
to the bell with a helper
down
below to attach each payload for the haul up. Including a power driver and
saber saw, it took six drop cycles to get everything
I
needed. Using the extension cord, I had
AC power too. The cord or rope is used
for tool and refuse removal when complete.
Finally,
drop the cord and the climb down is easy knowing a job well done!
A PCBR
Plus Kit was installed in this bell tower in Roan Mountain Methodist Church in
Tennessee.

The Church Bell Ministry is your
supplier for Church Bell Automation Equipment!